Thursday, October 31, 2013

Basic Gluten Free Yellow Cornbread


Gosh I love my all-purpose brown rice flour blend. I made a huge pot of homemade black bean beef & jalapeno chicken sausage sweet potato chili  (check back for I'll post the recipe soon enough) and of course a pan of cornbread. Being that I've never made gluten free cornbread before I was alittle worried; just a tad, that it would be spongy. I was wrong. Moist and fluffy cornbread was to be had by all. It was pretty simple dimple. I followed the recipe on the back of my Albers Corn Meal box and substituted the all-purpose with the brown rice all purpose recipe I treasure from King Arthur flour. I did add some xantham gum to the batter and a drizzle of maple syrup and butter to the top but that's it! Next time I'll put in some chopped up jalapenos, green onions and perhaps some cheese. :) This gluten free thing isn't too hard, now is it?

Ingredients (adapted from Albers)

1 cup GF Yellow Corn Meal
1 cup all-purpose brown rice mix

1 teaspoon xantham gum
1/4 cup granulated sugar
1 Tbsp. baking powder
1 tsp. salt
1 cup milk
1/3 cup vegetable oil
1 large egg, lightly beaten

1 tablespoon butter (for top)

Optional: 
drizzle of maple syrup (for top)
1/3 cup jalapeno, seeded and diced 
1/2 cup cheese (cheddar or Pepper Jack), shredded 
1 stalk green onions, sliced thin

Directions:

Preheat the oven to 400° degrees and grease 8-inch square baking pan.

In a medium mixing bowl, whisk together corn meal, gf all purpose mix, xantham gum, sugar, baking powder and salt.


 Add milk, oil and egg; mix well. 


Pour into prepared pan.

BAKE for 15 minutes than spread butter and drizzle maple syrup on top. Bake for another 10 to 15 minutes or until golden brown and toothpick comes out clean. 


Wednesday, October 30, 2013

Let's talk pasta. Specifically brown rice versus corn.


One of the items most people reminisce about is the pasta they'll miss out on when starting their gluten-free journey. At first I admit I panicked. I'm a pasta gal! I took every opportunity to go to different stores and made mental notes at their offerings. It wasn't much. But alas Trader Joe's had me covered. I know I mention them often but there's a reason, they have the goods my friends. I found these beautiful corn and brown rice based spaghetti noodles, penne and fusilli pastas all neatly arranged in the normal pasta aisle. They didn't have them tucked discreetly away on a tiny dedicated self of gluten free goods like so many other stores--I'm not "special." No, they understand and I heart them for it. I scooped up 2 packages of each. 

That night we tried the corn spaghetti it was a bit tricky--I won't lie. I couldn't tell when it was finished cooking! I did follow package directions like a good girl but being new to gluten free it was, well.......weird! What's with the cloudy water? Why was it so gooey looking (no I didn't over cook), I taste tested and okay it was good. However, 2 days later when I decided to have some leftover for lunch and reheated it..........BLAH! It was clumpy and a hardened mess. Not good. 

Then we (haha! "we" like anyone else in this house cooks!) substituted the brown rice penne for macaroni noodles in classic mac and cheese--it worked and reheated wonderfully! Yippee Skippee! Since then we have gone with only brown rice pasta and it hasn't disappointed  I cook the pasta about 8 minutes past the instructions on the package because if I follow those directions, it's too al dente for my taste. 

Here is the recipe for Seafood pasta (think seafood fettuccine that I'm so overjoyed about STILL being able to make and eat. 

Ingredients:

2 cups heavy whipping cream
1 package brown rice penne pasta (or any type you like)
2 garlic cloves, minced
2 tablespoons butter
1/2 small yellow onion, minced
1 tablespoon fresh minced parsley or 1 tsp dried
1/2 teaspoon oregano, fresh or dried
1 cup Parmesan cheese, grated plus 1/2 cup for garnish
1 pound mussels, not frozen
1 1/2 cup salmon or cod, cubed
1 pound black tiger shrimp, peeled and de-veined
1/2 large lemon, zested
lemon wedges
sea salt & black pepper to taste
1 tablespoon cornstarch, if needed
1/2 cup cremini mushrooms, sliced (optional)

Directions:

Cook the pasta until you think they're done. . .or package directions. :) Drain and set aside.

Saute the garlic and onions in small skillet, set aside.

In large pan/skillet melt the butter then add the heavy whipping cream and bring to a boil. Once it's boiling add in 1 cup of Parmesan cheese and mix. The cheese will aid in thickening the sauce as well as add that yummy flavor we all love.  Keep stirring on medium high heat until the bubbles become rather large (about 5 minutes). 


Turn down the heat to medium. Add the pasta and toss. Add salt and pepper, parsley and oregano.


Add the salmon/cod and mix. 


Add the mussels (make sure the mussels are closed. Place a lid onto the pan for 10 minutes (also if adding mushrooms) do so now. The mussels should be opening. If not, replace lid for another 5 minutes. Discard any that haven't opened, cause they're gondi (dead). Add the shrimp and toss. The shrimp will become opaque when they're cooked through. Squeeze 2 wedges of lemon and toss. Sprinkle the lemon zest and more Parmesan cheese over the pan or over the plate when serving, don't forget the lemon wedge. Enjoy cause it's yummy!


Pandan Mochi Cake


I was looking over this blog's stats today and noticed that at least 6 times a week my Durian Coconut Mung Bean Cake recipe is read at least 6 times a week. I remember seeing my photos for the pandan version of this cake and figured I would go ahead and post the pics and corresponding recipe. It makes me smile to think that people are trying and enjoying the other recipe. Especially since it has durian in it. While pandan is very flavorful it isn't pungent like durian, pandan has a rather sweet vanilla almondish scent and taste and is found in many Vietnamese desserts.


Ingredients:

1 pound mochiko (glutinous rice flour)
2 cups white sugar
2 teaspoon baking powder
1/2 cup butter, melted
1 can coconut Milk
1 can evaporated Milk
1/2 cup water or milk
5 eggs
1 teaspoon vanilla extract
1/2 cup sweetened, flaked coconut
1 cup steamed yellow mung bean
1 tablespoon pandan extract


Directions:

If you can't find pre-steamed mung beans at the International grocers, buy dried yellow mung beans. Take about 1/2 cup dried yellow mung bean and steam in rice cooker or over stove. They will double in size when cooked. Approximately 20 minutes.


Preheat the oven to 350 degrees. Lightly grease a 9x13 inch baking dish. 

In a medium mixing bowl, add flour, eggs, vanilla, butter, water and evaporated & coconut milks, mix. Add baking powder, sugar, vanilla, pandan extract and whisk. Mix in the coconut and mung bean.


Pour into prepared pan and on middle rack of preheated oven. 

Bake for 1 hour. Cool for about 30 minutes. 


Cut into squares. This is best eaten warm. You can store this by wrapping in plastic wrap when cooled, but before eating, reheat the square in the microwave for about 20 to 25 seconds.

Sunday, October 27, 2013

My review of Dinner Rolls/Muffins recipe.


I'm trying out different roll recipes I find on the web and thought I'd share with you my findings starting with this recipe from Lynn's Kitchen Adventures Blog. Her blog is great, she has a variety of recipes and I encourage everyone to take a peek at it. I first saw this on Pinterest and the description of "Light and Fluffy" rolls prompted me to give these a try. The ingredients seemed to be the usual suspects of flours and starches (rice, tapioca and potato) which I have well stocked in the pantry. I followed her recipes with the batch initially to the letter then deviated with the last half with the addition of mozzarella cheese--I had to see what the cheese would do.  All in all the recipe is easy, you just have to have a bit of patience to let it rise the prerequisite 4 times. They did indeed fluff up but "light" is not what I would call these little handfuls. They are fluffy and spongy and not at all crumbly. They would be great for slopping up soups or stews with and are good with a pat of butter or jam and are better then some of the crumbly messes I've tried in the past. I'm going  to adapt them a bit next time in hopes of getting that far too elusive "light" roll/muffin. I think a combination of the crumbly recipes and this one might just hit the Holiday table. One can only hope!

Ingredients:

2 tablespoons active dry yeast
1 cup plus 2 tablespoons warm water (about 110 degrees)
1/3 cup oil
1/4 cup sugar
1 egg
1 teaspoon salt
2 1/2 tablespoons xanthan gum
1 1/4 cups white rice flour
1 cup brown rice flour
3/4 cup potato starch
1/3 cup tapioca starch


Note: Please she her blog for directions. This is a brief summary.


My type of cooking--one bowl recipe. The less gooey dishes to wash the better!


After mixing it all up, just scrape the sides making a mound.


Okay this is the 1st rise after 30 minutes. Looks promising.


Lightly fold the dough into itself and scrape down again. Repeat the process 3 more times.


This was the 4th rise. Liking the air pockets.

I scooped 1/2 of the dough into my prepared muffin pan and added the mozzarella to the remainder.

This recipe made enough for 12 normal size muffins. 


Didn't they fluff up nicely? The 6 in the back are the ones with the cheese, hence the toasty parts. 


These would be good with pasta as well. 


Friday, October 25, 2013

As promised BBQ Chicken Pizza (gf pan crust)


I thought I'd take this opportunity to try something with the thin crust recipe I posted the other day. Knowing that cheese is what made the crust so chewy and hold up, I wondered what a different cheese would do to the crust. Instead of the Mozzarella I used Monterrey which is a natural pairing for bbq chicken. I also wondered what alittle bit of baking soda would do. Cooking is about experimenting right? I made the crust using the basic chewy recipe, made my addition and substitution.  After I pre-baked the crust, I could tell the crust did rise about 30% higher then the other recipe. Hmmm interesting, how would it taste? The Monterrey did help hold the crust together, thus no crumbly/flaky crust but it wasn't as chewy as the Mozzarella crust. It's also fluffier for sure, yet so fold-able. For a gluten free pan crust it's not bad at all, but Moe and I prefer the chewier crust; whereas our son prefers this pan version. Now we know the cheese does make a notable difference in the elasticity of the dough and the baking soda did help with the fluffy factor. Let me know which one you all like. 

Ingredients Crust (this is for a large pizza 20"):
2 cups brown rice flour, plus 1/2 to 1 cup more for dusting & rolling
1 cup of potato starch
1 cup of tapioca starch
1 Tablespoon active dry yeast
3 teaspoons xantham gum
1 teaspoon sea salt
1 Tablespoon sugar
1 teaspoon Knox unflavored gelatin
1 1/2 cups milk, warmed
1 teaspoon baking soda 
1 egg, at room temperature
1 stick of butter, melted
1 1/2 cup Monterrey cheese, shredded
olive oil for pan
corn meal for pan

Toppings:
1/4 large red onion, sliced
1 green scallion
1/2 cup your favorite bbq sauce (I used Sweet Baby Ray's original)
1 1/2 - 2 cups shredded chicken, boneless and skinless (I used Rotisserie)
2 large garlic cloves, minced
1 teaspoon smoked paprika
1/2 teaspoon oregano
1/2 teaspoon parsley
1 cup Monterrey cheese, shredded
1 cup Mozzarella cheese, shredded
Salt and pepper to taste
drizzle of olive oil


Directions:

Prepare crust and pizza pan as directed here and pre-bake in oven at 350 degrees on middle rack for 25 minutes. Remove from oven.


See how high this rose? It turned my thin crust into a pan. Is it the different cheese or baking soda? 

Prepare your toppings.


Drizzle some about 1 tablespoon of olive oil onto the crust. Spread on the bbq sauce, sprinkle with garlic and red onion slices.


Add the chicken, Mozzarella, Monterrey cheeses and scallions. Sprinkle on the paprika, oregano, salt and pepper.


Turn up the oven to 375 degrees, place the pizza back onto the middle rack and bake for about 15 minutes or until cheese is bubbly. Remove from oven and let set for 10 minutes before slicing. I ate 3 slices my friends. First plain-- classic BBQ chicken, then with some sriracha sauce-added a wonderful smoky spice. 


Then with Kapowie dressing (I had to try)--the cilantro and lime really complimented it. I have no idea which version I liked most. They all have their own special attributes.


Thursday, October 24, 2013

Facebook groups

Over the years I've joined numerous Facebook groups for various hobbies but had never really started one myself. I joined a gluten-free group (named "Gluten Free") awhile ago and it's been very helpful. Tips on products, illnesses and foods to avoid and a whole lot of mental support, join them here. Once in awhile people would post recipes but I really had to wade through numerous postings and random SPAM to find them. 

After thinking about all those recipes I've tried and liked and didn't--I decided today to start a Blissfullicious Gluten Free Recipe group dedicated to just GF recipes and reviews. I hope you join me there and share with the group your successes and failures while cooking through this gluten-free journey. You can find us here on facebook. Come join us!

Gluten Free Chewy Thin Crust Pizza, do it with me--SMILE!


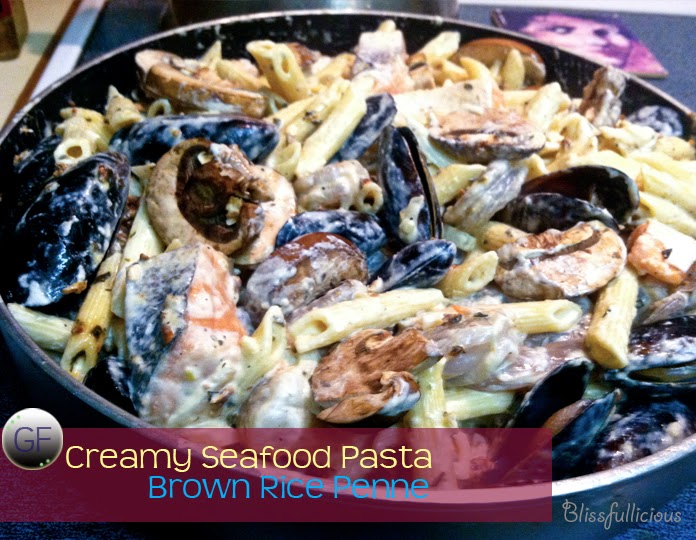
I'm sure some of you have looked at my photos and thought "Oh my.. . . she needs photography classes!" I'm in no way a photographer and use a handy little digital and the lighting at our house isn't terrific. I do what I can and as you can see by the blue lighting bouncing off the wax paper it's usually early evening when I shoot the images. Also it's real hard to take the time to take finished product shots when everyone is so hungry and chopping at the bit for dinner! Over the past week I've been going through my images and ran across my gluten free pizza and realized I hadn't posted about it yet. I made this last month and remembered being so excited that the crust didn't crumble or flake--which is what the last handful of attempts have produced. In no way should pizza crust crumble, it's just not right or worth eating IMO. 

Let me tell ya, Moe is extremely picky about crust and my past attempts only resulted in him eating 1 slice. Which would normally be upsetting to me but wasn't (I couldn't eat more than 1 slice either), trying to come up with good gluten free recipes is time consuming and frustrating and afterall we started our gluten free diets because of him. Oh I tried several gluten free recipes posted on blogs and on the web and none of them bothered to write that their wonderful crust would crumble and your pizza slice would fall apart (you know what I'm referring to). Nevermind trying the recipes that calls for 7 different kinds of flours and starches! 

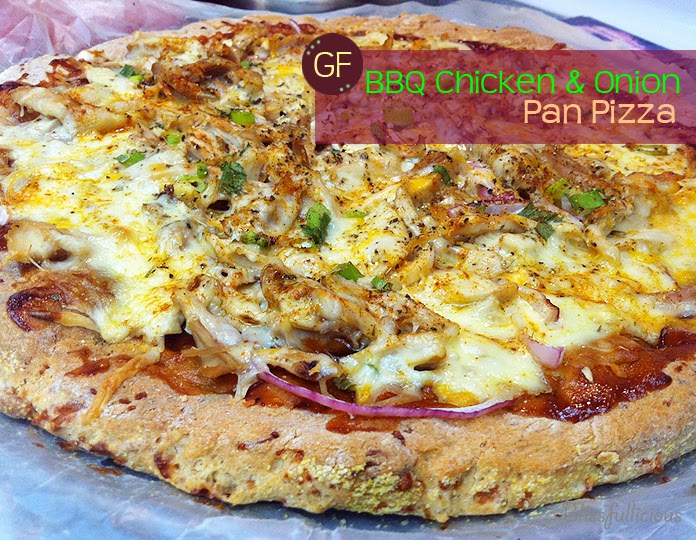
The challenge was on. After so many unsavory attempts of tweaking ingredients and methods, I was FINALLY (whew!) able to come up with a chewy thin(ish) crust. The key all along was putting cheese in the dough! Yes friends, I had experimented with some Pão de Queijo (Brazilian Cheese Bread); which by the way are pretty good, and wondered what adding some cheese would do to my crumbly pizza dough. Eureeka!! It works. We didn't stop eating it until every last chewy slice was gone. Ahhh the taste of success. The cheese helps bind everything together making for a nice elastic dough. I've only made this crust twice now (usually I don't post recipes until after I've made them numerous times), I'm making BBQ chicken pizza tonight and using up my rotisserie chicken and seeing what Monterrey jack cheese does to the crust. I'll post the results to that later.

Ingredients (this is for a large pizza 20"):
2 cups brown rice flour, plus 1/2 to 1 cup more for dusting & rolling
1 cup of potato starch
1 cup of tapioca starch
1 Tablespoon active dry yeast
3 teaspoons xantham gum
1 teaspoon sea salt
1 Tablespoon sugar
1 teaspoon Knox unflavored gelatin
1 1/2 cups milk, warmed 
1 egg, at room temperature
1 stick of butter, melted
1 1/4 cup mozzarella cheese, shredded
olive oil for pan
corn meal for pan

Pizza Sauce (makes enough for 2 large pizzas):
1 can diced Italian tomatoes 
1 small can of tomato paste
1 tablespoon oregono 
1 tablespoon fresh basil 
salt and pepper
1/2 teaspoon cayenne pepper or hot chili flakes (optional)
1 teaspoon garlic power (minced garlic would be great too)

Toppings (your choice, this is what I used):
1 1/2 cup Pizza sauce
pepperoni
1 1/2 cups Italian sausage, cooked and crumbled
3 cups of mozzarella, shredded or you can use fresh
mushrooms (optional)

Directions:

Pour warm milk (104 degrees) into bowl and add the yeast. Wait 10 minutes and allow yeast to proof. Pour ingredients into food processor or mixer. Add in the sugar, gelatin, warm (not hot) melted butter and mix. Add in the flour, starches, salt and xantham gum and pulse/mix for about 3 minutes. 


Now add in the egg and pulse.


Add 1 cup of mozarella and mix for another 2 minutes.


Remove the gooey mess from the mixture/processor onto a floured work surface. Sprinkle some flour on top and using your hands, work into a ball. Prepare your pizza pan. I lay down a layer of wax paper because my pan has air holes in it. But if yours doesn't skip it. Drizzle 2 tablespoons of olive oil on the pan and spread it around to fully cover the top. Sprinkle with cornmeal until lightly coated. Plop the dough ball ontop of the pan and start rolling it out from middle to edge. 


I sprinkled more flour ontop and used my hands and fingers to flatten the dough into the pan shape. Now cover it with a dishcloth and place on a warm surface like the stove top. Let it rest for about 1 hour. Preheat oven to 350 and prebake the crust for 25 minutes. 
Once the top is golden and toasty colored, check the bottom by gently lifting up an edge with a spatula or pizza cutter. Looks good? Okay take out of the oven and start spreading on your toppings.


Whip up the pizza sauce or use your own. Mix and spread.


I layer my pizza as follows: Sauce, half of the cheese, pepperoni, sausage, cheese, mushrooms or other veggies.


Since we already prebaked the crust it's important to turn up the oven temperature to at least 375 degrees for 15 minutes. Depending on how many toppings you used, you may have cook it longer, keep an eye on it after 15 minutes. If you think it's cooking too quickly on top, place aluminum foil loosely over the top of the pizza until it's finished baking.

Let's take a moment to look at that crust bottom. Isn't it nice? Firm, not flaky, no crumbles. Look pizza slice benders, you can bend your large slices again without it breaking. How awesome is your eating life right now? :) 


Russian inspired goodness. Creamy Cheese Mushrooms.


In a previous post I wrote about Oleg and my search for this creamy mushroom dish. Think of this as a flavorful creamed mushroom cheese dip. If you make this please do eat this with the Russian farmer's cheese patties (syrniki) or the very least a really fluffy french bread. 

Ingredients:

1 1/2 pounds of white or crimini mushrooms, cleaned and sliced.
1 medium yellow onion, sliced thin
3 cloves of garlic, minced
*3 cups of shredded cheese (Gouda and mozzarella)
2 cloves of garlic, minced
2 tablespoons of butter
1 cup sour cream
1 1/2 cup half and half 
1 teaspoon parsley
1 vegetable or chicken bouillon cube
1/2 teaspoon cracked black pepper 
1/2 teaspoon sea salt
1/2 teaspoon of cayenne pepper or smoked paprika (your choice)

*Note: You can use a cheese mixture of your choice or all Gouda or all mozzarella.

Directions:

Heat the butter in a skillet on medium high. 


Saute the mushrooms, onions and garlic. 


Add in the half and half, sour cream, salt, pepper, cayenne and bouillon cube.

Bring to a simmer then remove skillet from heat.

Pour mixture into casserole dish or baking pan.

Mix in 2 cups of cheese and parsley. Top with the remaining cheese. Sprinkle on a little more pepper and parsley.Cover baking dish with foil and bake on middle rack at 350 degrees for 25 minutes. 


Remove foil and bake for an additional 10 minutes or until the cheese is toasted brown. 


Russian Syrniki


I previously posted a recipe for Russian Farmer's Cheese (Tvorog) and now I'll post the recipe for Russian Syrniki--this is why I exercised my patience and went through the 15 hour process of making Farmer's Cheese. I've adapted the basic Syrniki recipe to be gluten free but you could easily make it with regular all-purpose flour, just leave out the xanthum gum. Syrniki is a Russian pancake and lots of people will serve them with berries and powered sugar. Some put fruit in the batter. I'm keeping these plain since I'm using a savory mushroom spread and using them as appetizers.

Ingredients (makes about 12 - 4 1/2" pancakes):

2 cups of Farmer's Cheese
4 large eggs
*1 cups gluten-free flour mix
3/4 cup gluten-free flour mix for dredging
3 Tbsp sugar
1/2 tsp salt
1 teaspoon xanthum gum or guar guar
1 tsp baking soda
1 tsp apple cider vinegar
olive oil for pan
*Click on the link for my gluten free mix towards the bottom of the link.

Directions:

In medium mixing bowl combine eggs, sugar, salt, xanthum gum, 1 cup of the flour and 2 cups of Farmer's Cheese and mix.


In a small bowl mix up the baking soda and apple cider vinegar.


Add the soda and vinegar mixture to batter and mix well by hand.

In a clean bowl or plate, add the remaining 3/4 cup of flour. Scoop a large spoonful of batter onto the flour and coat on both sides.
-

As with most gluten-free batters this is sticky. Coat your hands with some of the flour and gently form little round patties. Do this until all of the batter is gone.


In a large non-stick skillet, drizzle about 1 tablespoon of olive oil and heat to medium. Arrange your pancake patties in pan ensuring they don't touch and you have enough wiggle room to flip them. Like pancakes they puff up. Cook for approx. 5 minutes or until golden brown then flip and cook for an additional 5. Plate them up with your choice of toppings or use my cheesy mushroom spread. :)